Akamai Cloud Kubernetes Documentation
Cambria Stream / Stream Manager 5.4.0
Document History
| Version | Date | Description |
|---|---|---|
| 5.3.0 | 05/21/2024 | Updated for release candidate version 5.3.0.19481 (Linux, Windows) |
| 5.4.0 | 12/27/2024 | Updated for release version 5.4.0.22610 (Linux) |
Do not move forward with the installation process if you do not agree with the End User License Agreement (EULA) for our products. You can download and read the EULA for Cambria Stream, Cambria Stream Manager, and Cambria License Manager from the links below:
EULA_Cambria_License_Manager.pdf
EULA_Cambria_Stream_Manager.pdf
Limitations and Security Information
Cambria Stream, Stream Manager, and License Manager are installed on Linux in containers. Limitations and security checks done for this version are included in our general Linux Document below.
Note: this document is for referencing the software limitations for Linux only. The setup for Kubernetes starts in Section 2. Create Kubernetes Cluster.
Cambria Stream Manager / Stream:
Linux_Cambria_Stream_5_4_0_Guide.pdf
Note: this document references Kubernetes version 1.31 only
Important: Before You Begin
The sections below provide instructions on creating a NEW basic Kubernetes cluster with Cambria Stream with default settings and more open security settings. For more granular control and non-default settings, consult Akamai Cloud documentation.
Document Overview
The purpose of this document is to provide a walkthrough of the installation and initial testing process of the Cambria Stream Manager and Cambria Stream applications in the Akamai Cloud Kubernetes environment. The basic structure of the document is the following:
- Overview of the Cambria Stream / Stream Manager Environment in Akamai Kubernetes
- Create and configure the Kubernetes Cluster on Akamai Cloud
- Install Cambria Stream Manager and Cambria Stream on the Kubernetes Cluster
- Verify the installation is working properly
- Use / Test the Cambria Stream / Stream Manager applications
- Performance Metrics Setup
- Delete / Update the Kubernetes Cluster / Cambria Stream applications
- Updating Kubernetes Cluster
- Quick Reference of Kubernetes Installation
- Quick Reference of Important Kubernetes Components (urls, template projects, test player, etc)
- Glossary
1. Overview
This section is meant to provide a brief overview of what the Cambria Stream / Stream Manager system in Akamai Kubernetes entails and how the components interact.
Capella’s Cambria Stream Manager deployment is recommended to run on at least 3 nodes (replica = 3) with a service (Load Balancer) that exposes the application externally. Each pod has 2 working containers:
- Cambria Stream Manager (application)
- Leader Elector tool that chooses which of the Cambria Stream Manager pods to label as the main Cambria Stream Manager. The other Stream Manager pods serve as backup in case the leader stops working or goes down.
Also for the Cambria Stream Manager deployment, there is a PostgreSQL database in a separate pod for each of the Cambria Stream Manager nodes. The data is replicated between the different pods in order to preserve data in case of issues with the database and/or the Stream Manager application.
There is also a separate pod for the Cambria Stream Manager Web UI that also runs in one of the Cambria Stream Manager nodes. This is used to access the main UI for the application.
Capella’s Cambria Stream deployments run on every other pod that is created (in the node group where Stream instances are allowed). Each Cambria Stream pod has three containers:
- Cambria Stream (application)
- Auto-Connect Stream Instance dotnet tool that does the following:
- list pods
- attempts to find Cambria Stream Manager
- connects the Cambria Stream instance running in the pod to the Cambria Stream Manager that it found.
Each node in the Kubernetes Cluster will either be running the Stream Manager deployment or the Stream deployment.
2. Create Kubernetes Cluster
The following section provides the basic steps needed to create a Kubernetes Cluster on Akamai Cloud.
2.1. Create Kubernetes Directory
Create a specific directory in your filesystem to store all of the files for this setup. This will be called your Kubernetes Directory.
Windows:
mkdir -p %USERPROFILE%\kubernetes\Akamai
Linux / MacOS:
mkdir -p $HOME/kubernetes/Akamai
Note: the kubernetes directory should have read/write permissions enabled. For Linux and MacOS, run this command:
chmod -R 700 $HOME/kubernetes/Akamai
2.2. Create Kubernetes Cluster on Akamai Cloud Dashboard
Create Cluster on Akamai Cloud Dashboard
Choose a label for your Kubernetes Cluster, the region where it should be created in, and 1.31 for the Kubernetes Version.
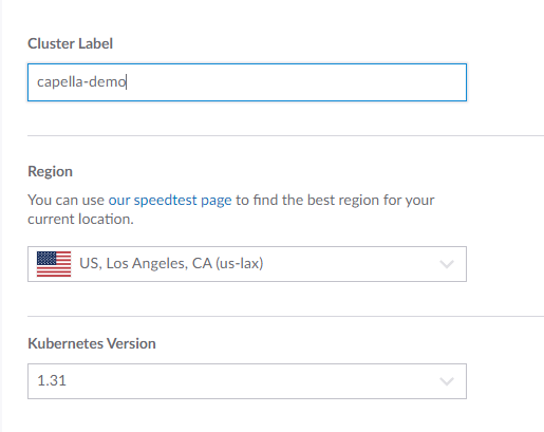
If this Kubernetes setup is for production, it is recommended to enable the HA Control Plane to activate high availability for the Kubernetes Cluster. Note that this does incur an additional cost on top of the Kubernetes Cluster specific costs. Otherwise, select the No option.
In the Add Node Pools section, there are two node pools that need to be added (1 for Cambria Stream Manager, 1 for Cambria Stream).
First, set the number of nodes for Stream Manager to the amount desired and click the Add button (See example below).
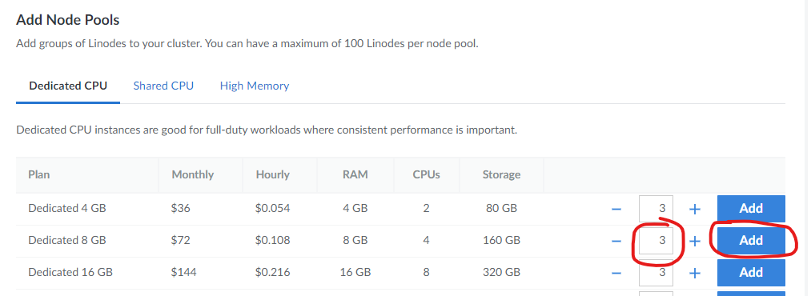
Information / Recommendation
Cambria Stream Manager manages scheduling and handling Cambria Stream encoding / packaging programs. You will want to think about how many programs you will intend to run and choose an instance type accordingly. Our lowest recommended machine type for the manager machines is Dedicated 8GB.
We also recommend setting the node count to 3. This is because 1 of the nodes will act as the Cambria Stream Manager node while the other 2 nodes act as backup (web server and database are replicated / duplicated). In the case that the Cambria Stream Manager node goes down or stops responding, one of the other two nodes will take over as the Cambria Stream Manager node. Depending on your workflow(s), you will want to think about how many backup nodes you may need (if any).
Then, select the number of nodes for Cambria Stream to the amount desired and click the Add button (See example below).
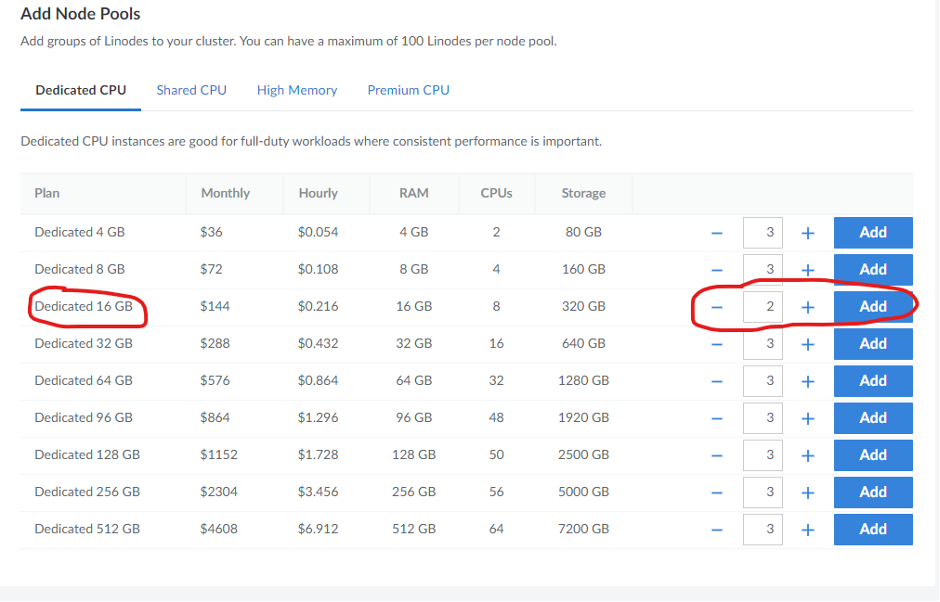
Information / Recommendation
Currently, Cambria Stream nodes need to be added manually. Therefore, you will need to think about what machine / instance type you need for running your Cambria Stream workflows. Based on benchmarks (See Section 3.4. Creating and Editing Helm Configuration File), our recommended machine / instance type to get started is Dedicated 16 GB.
initially, you only need 1 instance running in the node group. Later in this guide, you will configure the maximum number of Cambria Stream instances that you will need. When you are ready to use Cambria Stream machines, you can manually create nodes in this node group with the desired machine / instance type (from 1 up to the configured maximum number of Cambria Stream instances). To get started, we recommend setting this number to 2. This way, when the installation is complete, you will already have two Cambria Stream machines / instances to test with. You can always scale Cambria Stream nodes up and down depending on your needs.
Create the cluster. It may take several minutes for the initial Kubernetes system to load. Make sure that all of the nodes that you configured are up and running (State should be Running).
Once the kubernetes environment setup is complete, download the Kubeconfig file and move the file to your Kubernetes Directory.
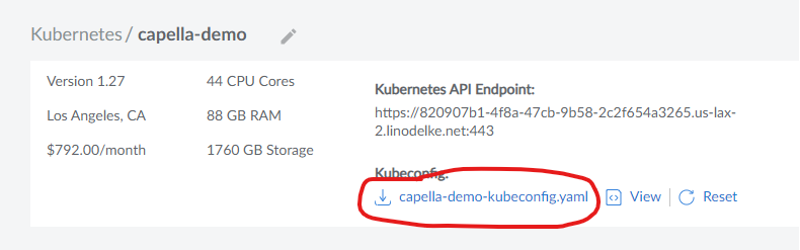
Open the Kubernetes Dashboard and use the Kubeconfig file you downloaded to log in to the dashboard.

3. Install Cambria Stream Manager, Cambria Stream, and Dependencies
3.1. Prerequisite: Installing and Configuring Kubectl and Helm
In order to install Cambria Stream Manager, Cambria Stream, and dependencies, you will need to first install the command line tools kubectl and helm on a local server and configure those tools to work with your Akamai Cloud Kubernetes environment.
3.1.1.1 Installation
Download and install kubectl on your local machine using the following guide:
Note: make sure the kubectl version is not more than 1 version ahead of the Kubernetes version. Eg. for Kubernetes version: 1.31, kubectl version: 1.31 or 1.32.
Note: for Linux, we assume an amd64 system. For MacOS, we use Homebrew to install as well as the ZSH terminal. These commands may or may not work on other systems, but it is not guaranteed. For more install options, see https://kubernetes.io/docs/tasks/tools/
Windows:
curl -LO https://dl.k8s.io/release/v1.31.0/bin/windows/amd64/kubectl.exe
Linux:
curl -LO https://dl.k8s.io/release/v1.31.0/bin/linux/amd64/kubectl
sudo install -o root -g root -m 0755 kubectl /usr/local/bin/kubectl
rm ./kubectl
MacOS:
brew install kubectl
3.1.1.2. Verify Installation
Run the following command to verify that kubectl was installed correctly.
kubectl version --client
Note: If the command does not work, make sure to add kubectl to your PATH environment variable (Windows) or that it is properly installed on Linux / MacOS (/usr/local/bin/kubectl).
Open a command line / terminal window if not already open and set the KUBECONFIG environment variable with the path to the kubeconfig.yaml file you downloaded from the Kubernetes Dashboard:
Windows:
set KUBECONFIG=<path-to-your-kubeconfig-file>.yaml
Linux:
export KUBECONFIG=<path-to-your-kubeconfig-file>.yaml
Note: you will need to repeat this step every time you close the command line / terminal window as this only sets the environment variable for the command line / terminal session.
Test that you can use kubectl with your Kubernetes environment
kubectl get nodes
You should get something similar to this:
NAME STATUS ROLES AGE VERSION
lke104917-156831-64480c085671 Ready <none> 32m v1.26.3 lke104917-156831-64480c087c83 Ready <none> 32m v1.26.3 lke104917-156831-64480c08a1de Ready <none> 32m v1.26.3
If having issues, make sure your KUBECONFIG path is correct and that the Kubernetes environment is running properly.
3.1.2. Installing and Configuring Helm
In your local server where kubectl is installed, follow the instructions in the link below to install Helm:
3.1.2.1. Installation
Download and install helm on your local machine using the following guide:
Note: for Linux, we assume an amd64 system. For MacOS, we use Homebrew to install as well as the ZSH terminal. These commands may or may not work on other systems, but it is not guaranteed. For more install options, see https://helm.sh/docs/intro/install/
Windows:
curl -LO https://get.helm.sh/helm-v3.15.1-windows-amd64.zip
Linux:
curl -fsSL -o get_helm.sh https://raw.githubusercontent.com/helm/helm/main/scripts/get-helm-3 chmod 700 get_helm.sh ./get_helm.sh <br />rm ./get_helm.sh
MacOS:
brew install helm
3.1.2.2. Verify Installation
Run the following command to verify that helm was installed correctly.
Note: If the command does not work, make sure to add helm to your PATH environment variable (Windows) or that it is properly installed on Linux / MacOS (/usr/local/bin/helm).
helm version
3.2 Deployments
3.2.1. Deploy Cloud Native Postgres
Cloud Native Postgres is the database used in the Kubernetes environment for the Cambria Stream and Stream Manager software data.
kubectl apply -f https://raw.githubusercontent.com/cloudnative-pg/cloudnative-pg/release-1.20/releases/cnpg-1.20.1.yaml
3.2.2. Deploy argo-rollouts
Argo-rollouts is a third-party orchestration system that we use, in this case, for updating the Cambria Stream and Kubernetes environment through a rollout process.
kubectl create namespace argo-rollouts
kubectl apply -n argo-rollouts -f https://github.com/argoproj/argo-rollouts/releases/download/v1.5.1/install.yaml
3.2.3. Deploy argo-events
We will also be using argo-events in the future for handling tasks in Cambria Stream based on specific events (triggers).
kubectl create namespace argo-events
kubectl apply -f https://raw.githubusercontent.com/argoproj/argo-events/stable/manifests/install.yaml
3.2.4. Deploy cert-manager
The cert-manager tool is used for handling SSL certificates to the services in the Kubernetes Cluster (such as the Cambria Stream Manager WebUI, REST API, etc).
kubectl apply -f https://github.com/cert-manager/cert-manager/releases/download/v1.12.0/cert-manager.yaml
3.2.5. Deploy ingress-nginx
The ingress-nginx service is used to allow you to configure a domain name for the Kubernetes Cluster services (Eg. https://mydomainname.com).
Install these prerequisites:
kubectl apply -f https://raw.githubusercontent.com/kubernetes/ingress-nginx/controller-v1.8.1/deploy/static/provider/cloud/deploy.yaml
3.3. Prerequisite: Install GPU Operator for NVENC
This section is only required for a Kubernetes cluster that will use GPUs. Skip this step if you will not use GPUs in this Kubernetes cluster.
Important: you must have at least one node with a GPU already deployed in your kubernetes environment
In your command prompt / terminal, run the following commands to deploy the GPU Operator to the Kubernetes cluster:
helm repo add nvidia https://helm.ngc.nvidia.com/nvidia helm repo update
helm install nvidia-operator nvidia/gpu-operator --namespace gpu-operator --create-namespace
Run this command with 'kubectl' and make sure that all of the pods are in a Running or Completed state:
kubectl get pods -n gpu-operator
If any pod is still in an Init state or PodCreating state, wait another 5 minutes to see if the pods will complete their install process.
For any pods that are in an errored state or that are still in an Init state after 10 minutes, do the following:
- Check that at least one node is one of the supported AWS GPU instances
- Use the following command to check the state of a failing pod (check the Events section):
kubectl describe pod <your-pod-name> -n gpu-operator
You can either look up the error for a potential solution or send the entire Events section to the Capella support team for investigation.
3.4. Creating and Editing Helm Configuration File
With Helm and Kubectl installed on your local server, you can now create the Helm configuration file (yaml) that will be used to deploy Cambria Stream Manager / Cambria Stream to the Kubernetes environment.
Download the Capella Stream Manager Configuration Files Archive. There are two options:
Option 1: (Default) Regular Cambria Stream Application
curl -Lo capella-stream.tgz "https://www.dropbox.com/scl/fi/x2vyn3yt39avh65pqh699/capella-stream-0.4.11.tgz?rlkey=8lx2sm2fnqx91xibc7hnj3h7z"
Option 2: Cambria Stream Application with Auto Ad Break (OCR) Feature
curl -Lo capella-stream.tgz "https://www.dropbox.com/scl/fi/nyx66r07ilfcjbmy045a6/capella-stream-0.4.11-ocr.tgz?rlkey=4nz8paifjodia1v7zxydiss2q"
In a command line / terminal window, run the following command to create the configuration file:
helm show values capella-stream.tgz > capellaStreamConfig.yaml
Open the configuration file in your favorite text / document editor and edit the following values:
Blue: values in blue will be given to you by Capella. These values in the chart below are for the release version.
Red: values in red are proprietary values that need to be changed based on your specific environment
| capellaStreamConfig.yaml | Explanation |
|---|---|
workersUseGPU: allow workers to use nvidia GPU | If working with GPUs or NVENC workflows, set this value to true. Otherwise, leave as false. |
nbGPUs: how many GPUs are on the nodes. Only has an effect if workersUseGPU is set | If workersUseGPU is true, set this to the number of GPUs available on the worker nodes. Note that your Cambria Stream license must include support for multiple GPUs. |
managerInstanceType: database and Cambria StreamManager will be restricted | The instance type for Cambria Stream Manager machines. Change this to the instance type chosen when creating the Cambria Stream Manager nodes, for example g6-dedicated-4. |
workerInstanceType: instance type for the worker nodes | The instance type for the Cambria Stream worker nodes. Change this to the instance type chosen when creating the Cambria Stream nodes, for example g6-dedicated-8. |
maxWorkerInstances: maximum number of worker instances (ie replicas) | The maximum number of Cambria Stream machines that can be spawned. By default, this is 20, but it is recommended to start with a smaller number for testing. |
workerRolloutStep1Weight: when upgrading Cambria Stream version | For upgrades, Capella uses argo-rollouts to incrementally upgrade nodes. The first value is the percentage of all the nodes that should be upgraded first. The second value is the percentage of all the nodes that should be upgraded second. See the Upgrading Kubernetes Cluster section for more information. |
workerRolloutMaxUnavailable: during argo-rollout Cambria Stream upgrade | Determines how many worker pods can be offline at once during an upgrade. It is recommended to set this to [maxWorkerInstances] - [min # of active nodes] + 1. For example, if maxWorkerInstances=20 and you want at least 2 active, workerRolloutMaxUnavailable=19. |
pgInstances: number of postgresql database instances (ie replicas) | The number of instances for Cambria Stream Manager and postgres database. These two values must match each other and also the amount of nodes for Stream Manager created in step 1. In this case, the value will be 3. |
routingInputPortBegin: the beginning input port for Akamai Cloud Routing. | These are settings for routing RTMP streams to Cambria Stream instances. |
defaultMachineMaximumInstances: maximum allowed instances for each new machine.
Default: -1 (up to the license limit) | Configures the maximum number of channels each Cambria Stream node can run. A value of -1 means there is no explicit limit other than what the license allows. |
externalAccess: | Set to true if you want Cambria Stream Manager to be accessible from outside the cluster. Otherwise, set this to false. |
enableIngress: enable ngingx ingress | These fields allow you to have a self-signed certificate and use a purchased domain name for your Kubernetes Cluster. If you do not plan to use this feature, you can either set enableIngress to false or leave the fields as is. If planning to use this feature, follow these steps: https://www.dropbox.com/scl/fi/p6i363hz5n0s9uney1zxf/Cambria_Kubernetes_Domain_DNS_Guide.pdf?rlkey=k8zjj0zqdwvsjtp3yozr7uzh8&st=2xuzj2qj&dl=1 |
externalStreamIPs: | This setting is for controlling what ip addresses can send streams to the Cambria Stream instances running on Kubernetes. By default, it is set to false to indicate that there are no ip restrictions. Set this value to true if you want to restrict to certain ip addresses. Add the ip addresses to allow in the list of allowedExternalStreamIPs. |
secrets: | The PostgreSQL database password. It is recommended to replace the default value with something secure. |
cpLicenseKey: license key | The Cambria Stream product license key. Replace the XXXXXX placeholder with your actual key. |
cpLicenseKeyManager: license key for the manager nodes | The Cambria Stream Manager license key. Replace the YYYYYY placeholder with the real manager license key. |
cambriaStreamManagerAPIToken: API token for Cambria StreamManager | An API token for Cambria Stream Manager. Change this to a secure value. |
cambriaStreamManagerWebUIUser: user/password to access Cambria Stream | Credentials for the Cambria Stream Manager Web UI. The format is role,username,password. You can list multiple sets separated by commas. |
akamaiCloudAPIToken: Akamai Cloud API token, used for horizontal scaling | This is your Akamai Cloud API Token, used for horizontal scaling integration. Replace the placeholder with your actual token. |
Akamai Cloud Machine Information
Cambria Stream has two types of workflows: encode and packager. The benchmarks below are separated into these two workflows. The recommended machines for the Cambria Stream instances are the ones that the Capella QA team has been using for testing.
For encoding workflows, the recommended machine has been able to handle 1 program with an Adaptive Streaming HLS output at real-time with the following 4 video quality levels (1920x1080, 1280x720, 854x480, 640x360) at 29.97 FPS, and 1 audio quality level (128 Kbps).
Tested Machine: g6-dedicated-8 [ AMD EPYC 7713 ]
| Name | RAM | CPUs | Storage | Transfer | Network In/Out | Cost per Hour |
|---|---|---|---|---|---|---|
| Dedicated 16 GB | 16 GB | 8 | 320 GB | 6 TB | 40 Gbps / 6 Gbps | $0.216 (as of 11/13/2024) |
For packager workflows, the recommended machine has been able to handle 1 program with an Adaptive Streaming HLS output at real-time with the following 4 video quality levels (1920x1080, 1280x720, 854x480, 640x360) at 29.97 FPS, and 1 audio quality level (128 Kbps).
Tested Machine: g6-standard-1 [ AMD EPYC 7713 ]
| Name | RAM | CPUs | Storage | Transfer | Network In/Out | Cost per Hour |
|---|---|---|---|---|---|---|
| Linode 2 GB | 2 GB | 1 | 50 GB | 2 TB | 40 Gbps / 2 Gbps | $0.018 (as of 11/13/2024) |
3.5. Install Cambria Stream Manager and Cambria Stream
Wait at least 5 minutes after installing prerequisites before moving on to this step.In a command line / terminal window, run the following command:
helm upgrade --install capella-stream capella-stream.tgz --values capellaStreamConfig.yaml
The result of running the command should look something like this:
Release "capella-stream" does not exist. Installing it now.
NAME: capella-stream
LAST DEPLOYED: Wed May 30 10:09:47 2023
NAMESPACE: default
STATUS: deployed
REVISION: 1 T
EST SUITE: None
At this point, several components are being deployed to the Kubernetes environment. Wait a few minutes for everything to be deployed.
4. Verify Cambria Stream Manager / Stream Installation
4.1. Verifying Helm Deployment
In the Kubernetes dashboard, review that the following resources / services are available / running in the Default namespace:
| Namespace | Content |
|---|---|
| argo-events | Several components; all should have a green status circle |
| argo-rollouts | Several components; all should have a green status circle |
| capella-worker | - X pods with cambriastream in the name (X = Max # of Cambria Stream’s specified in config file) Note: it is ok if they don’t have a green status circle |
| cert-manager | Several components; all should have a green status circle |
| cnpg-system | Several components; all should have a green status circle |
| default | - 1 cambriastreammanagerapp deployment - 1 cambriastreammanagerwebui deployment; green status circle - 1 live-stream-firewall deployment; green status circle - 1 live-stream-router deployment; green status circle - X pods with cambriastreammanagerapp in the name (X = # of replicas specified in config file); status color should be green - 1 pod with cambriastreammanagerwebui in the name - 1 pod with live-stream-firewall in the name - X pods with pgcluster in the name (X = # of replicas specified in config file); status color should be green - 3 services with pgcluster in the name; status color should be green - 1 service named cambriastreamservice; status color should be green; should show an External IP Address - 1 service named cambriastreammanagerwebuiservice; status color should be green; should show an External IP Address |
| ingress-nginx | Several components; all should have a green status circle |
4.2. Checking Cambria Stream Manager Web UI is Accessible
In your Kubernetes Dashboard, go to the Service > Services section in the cambriastreammanagerwebuiservice, get the public IP address / hostname from the External Endpoints (Eg. 104-200-26-151.ip.linodeusercontent.com), or you can also click on the link and change http:// to https://:

- In any web browser, type in the following url: https://[ HOSTNAME | EXTERNAL IP ]:8171 (Eg. https://104-200-26-151.ip.linodeusercontent.com:8171). This will show a warning page similar to this one (Example from Google Chrome):
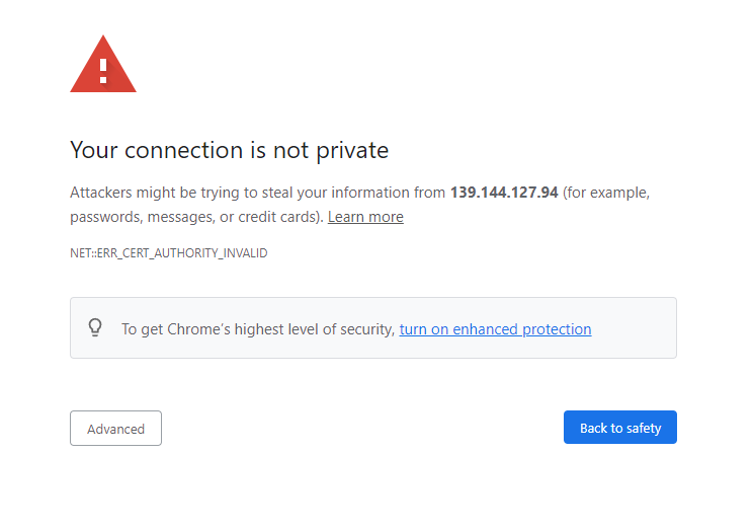
Click on Advanced and Proceed to [ HOSTNAME | EXTERNAL IP ] (unsafe). This will show the login page for the Web UI.
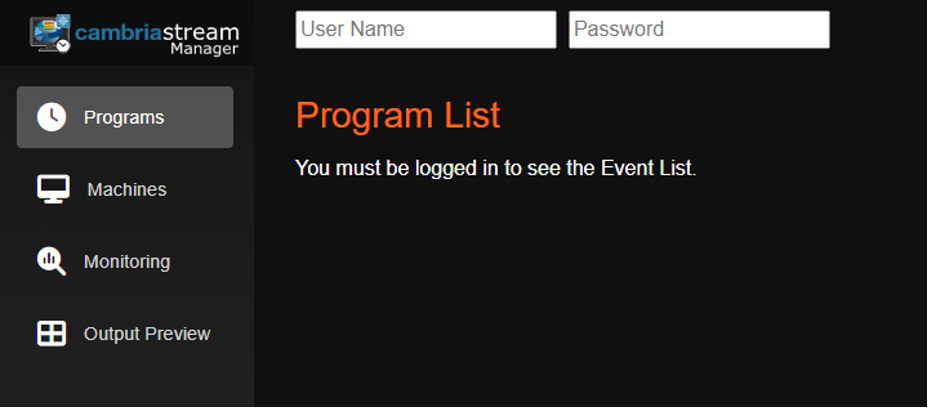
Enter the WebUI credentials for one of the users that you configured and make sure you are able to log in without any issues.
5. Cambria Stream User Guide
5.1. Prerequisite: Configuration for Cambria Stream Manager | Cambria Stream
Before using Cambria Stream, configure the following in the Kubernetes environment.
5.1.1. Verify Cambria Stream Instances are Connected
By default, the auto-connect container in each Cambria Stream pod should automatically add all new Cambria Stream instances to Cambria Stream Manager and activate them. All usable Cambria Stream instances will show an Online status.
Note: for Cambria Stream with OCR, it may take 5+ minutes on top of the amount of time that it normally takes for nodes to be up and running. The OCR build is heavy and requires more time to create the Cambria Stream container.
If a Cambria Stream instance does not show up in the list, do the following:
Run the following command to get the internal ip address of the pod that the Cambria Stream instance belongs to (replace <pod-name> with your pod name):
kubectl get pod/<pod-name> -o=jsonpath={.status.podIP} -n capella-worker
In the Cambria Stream Manager Web UI, go to the Machines tab and click on the Add button. Enter the ip address from step 2. This should add the Cambria Stream instance to the list of machines. Repeat steps 1 and 2 for each Cambria Stream pod that you want to add.
If a Cambria Stream instance shows the status Standby, this means the instance is up and running but is not currently usable by Cambria Stream Manager to stream. In order to make this instance available for streaming, do the following:
- Right-click on the machine and select Activate. This should change the status of the instance to Online.
5.1.2. Setup for Incoming Live Streams
The streams will have to be sent directly to the Kubernetes nodes that are hosting the Cambria Stream application containers (cambriastreamapp).
5.1.2.1. Option 1: Using Streaming Router
This option makes use of an Akamai Cloud Node Balancer to route RTMP streams to configured Cambria Stream programs. In order to use this streaming option, do the following:
Get the IP address of the node balancer:
- In your Akamai Cloud dashboard under Kubernetes, click into your Kubernetes cluster
- Get the ID of the Kubernetes cluster from the url shown in your web browser. Example:
https://cloud.linode.com/kubernetes/clusters/<ID>/summary - Still in the Kubernetes Dashboard, go to NodeBalancers and look for the node balancer with the name
<ID>-inputstreams (replace<ID>with your Kubernetes Cluster ID) - Copy the IP address of the node balancer
Create your routing tag for your program. You will need one tag for every program that will use the Streaming Router. Write these tags down somewhere as you will need to set the Description of your Cambria Stream program to one of the tags:
- Set the Cambria Stream Program Description to ROUTING:
<Your RTMP Port>:1935 (replace<Your RTMP Port>with one of the available ports in the Ports column of your router node balancer from step 1). - The source must be RTMP and the source port must be 1935. You can only configure one source to the router per Cambria Stream Program
Configure your input signal to use the IP address from step 1 with the RTMP port from step 2 (Eg. 104.102.35.77:1936)
5.1.2.2. Option 2: Use External Application to Stream
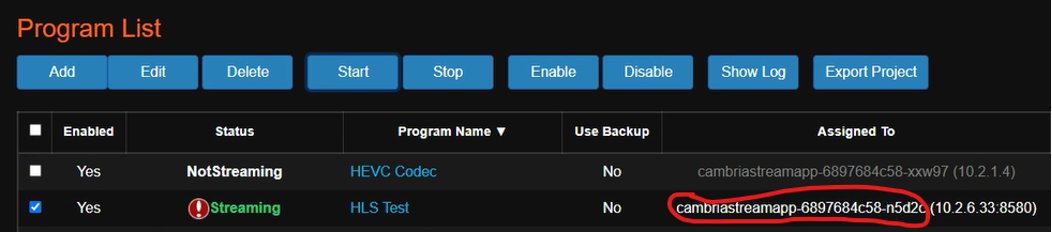
In the Cambria Stream Manager WebUI, get the name of the Cambria Stream instance that is running the program:
Run the following command to get the name of the node that is hosting the Cambria Stream instance (replace <pod-name> with your pod name):
kubectl get pod/<pod-name> -n capella-worker -o=jsonpath={.spec.nodeName}
Get the external IP address of the node with the following command (replace <node-name> with the node name from step 2):
kubectl get node/<node-name> -n capella-worker -o=jsonpath={.status.addresses[1].address}
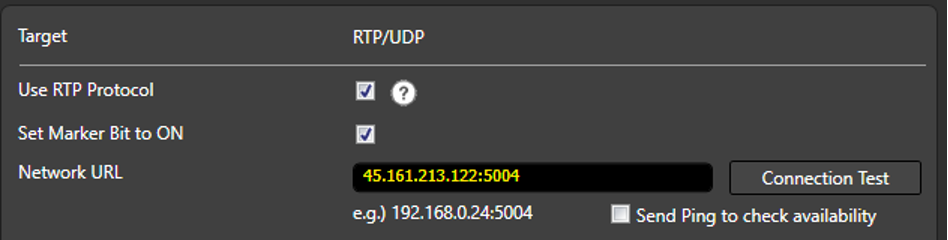
Configure the source signal in your preferred application with the external ip of the Cambria Stream node and the configured port from the project. Example with RTP:
5.1.2.3. Option 3: Using RtpSender.out Tool [ FOR TESTING PURPOSES ONLY ]
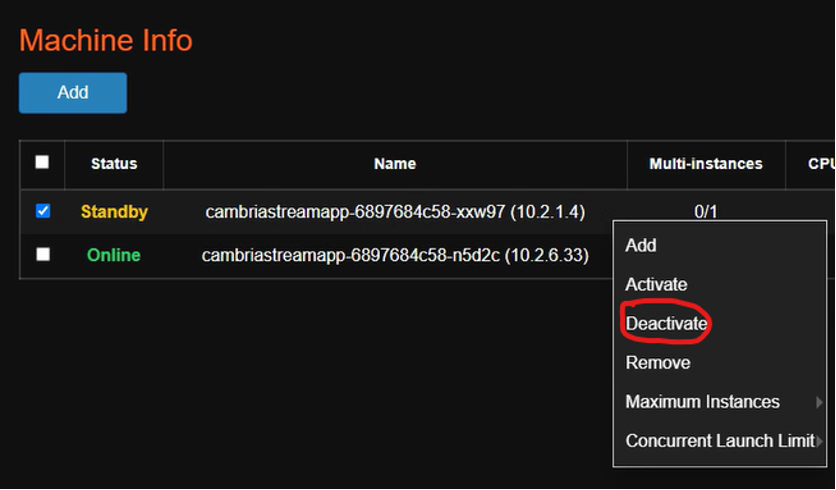
In the Cambria Stream Manager Web UI, go to the machines tab and choose one of the machines to act as the RTP sender machine.
Deactivate the RTP sender machine by right-clicking on the machine and selecting the Deactivate option. This will make the machine unusable as a Cambria Stream instance. This step is needed because using both RtpSender.out and Cambria Stream on the same instance could cause issues.
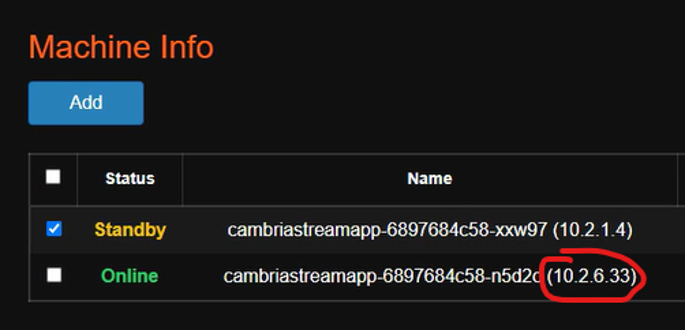
Get the internal IP address of the instance the Cambria Stream program will run on. Write this IP address down somewhere as you will need it for a later step.
You will need to log-in to the cambriastreamapp container in this pod with kubectl. Run this command (replace the cambriastreamapp-559f7ddc5d-85gpx value with your pod name):
kubectl exec -it <span style={{ color: 'red' }}>cambriastreamapp-559f7ddc5d-85gpx</span> -c cambriastreamapp -n capella-worker -- /bin/bash
If using sources from an S3 compatible storage, you will need to set the credentials as environment variables in this container. Run the following commands (use your specific credentials):
export AWS_ACCESS_KEY_ID=ABCAAZ893YTL79
export AWS_SECRET_ACCESS_KEY=xBn9800;ad&lm1928
Use the cd command to go to the directory with RptSender.out
cd /opt/capella/CambriaStream/bin
Run this command to start RtpSender.out (use the internal IP from step 6 and the port you set for the Cambria Stream program created):
Note: only TS sources work with RtpSender.out
Option 1 - With S3 sources:
mybucket: the name of the S3 bucket where the source is located.
bucket-region: the region that the S3 bucket resides in (Eg. us-east-1)
path/to/my/sourcefile.ts: the path inside the S3 bucket to the TS file.
<StreamIP>: the IP address from step 4
./RtpSender.out --src [s3]mybucket@bucket-region:path/to/my/sourcefile.ts --mode 0 --url <StreamIP> --port 5004 --loop 1
Option 2 - With sources locally / in volume accessible to the container:
<StreamIP>: the IP address from step 4
./RtpSender.out --src /path/to/my/sourcefile.ts --mode 0 --url <StreamIP> --port 5004 --loop 1
To stop the RtpSender.out, you will need to kill the RtpSender.out process. Run the following commands:
- Get the process id of the RtpSender.out process:
ps aux
- Run the kill command on the process id
kill <RTPSender.out Process ID>
5.2. Using / Testing Cambria Stream
For information on how to configure, run, and use Cambria Stream and Cambria Stream Manager, see the following:
5.3. (Optional) Using the REST API
To get the url for the REST API server, do the following:
- In the Kubernetes dashboard for your cluster, go to the Services section
- Look for the cambriastreamservice service in the Services section. Get the IP address of one of the External IP addresses (Eg. 104.200.27.119), or you can also click on the link and change http:// to https://:

Example of REST API Url:
https://104-200-27-119.ip.linodeusercontent.com:8758/CambriaLM/v1/Events?usertoken=12345678-1234-43f8-b4fc-53afd3893d5f
As shown in the example above, the Cambria Stream API token will need to be included in the usertoken argument at the end of the url. This token will be needed for most REST API calls to the Cambra Stream Manager web server.
6. Performance Metrics Graph Setup via Prometheus / Grafana & Logging via Loki / Promtail
See the following document for setting up Cambria Stream Manager metrics (graphs):
7. Deleting Kubernetes Cluster
Use the following steps to delete your Kubernetes environment:
- In the Akamai Cloud Home page, click on the Kubernetes section and delete the Kubernetes Cluster
- In the NodeBalancers section, delete the node balancer that was created by the Kubernetes Cluster
- In the Volumes section, delete the volumes that were created by the Kubernetes Cluster
8. Updating / Upgrading Kubernetes Cluster
The current way to update a Kubernetes Cluster is through a third-party tool called argo-rollouts. This process allows you to manually upgrade pods incrementally. There are four steps involved in the upgrade process:
-
Upgrade X% of total Cambria Stream worker pods (workerRolloutStep1Weight value). That means if you have 5 pods and step 1 is to upgrade 10%, that means 1 pod will be upgraded.
-
When the pods are upgraded successfully, argo-rollouts goes into a pause state. While in this state, argo-rollouts waits for the user to manually move on to the next step. This is so that the user can verify that the upgraded pods are working properly.
-
Upgrade X% of total Cambria Stream worker pods (workerRolloutStep2Weight value). That means if you have 5 pods and step 3 is to upgrade to 40%, that means 2 pods will be upgraded. However, since 1 pod has already been upgraded from step 1, that means only 1 pod will be upgraded in this step.
-
This is the same as step 2. In this case, argo-rollouts waits for the user to manually verify that the upgraded pods are working properly. After this step, the rest of the pods in the cluster are upgraded.
Follow these steps to upgrade your Cambria Stream Manager, Cambria Stream, and/or Helm-managed Kubernetes environment:
Before doing any upgrades, you will need to make sure you are fully aware of your current setup and save all configurations, programs, keys (such as DRM keys, AWS keys, etc), and previous yaml files (Eg. cambriaStreamConfig.yaml). There are some things to keep in mind:
- For upgrading to new Cambria Stream / Stream Manager versions, please use our newest Cambria Stream Kubernetes guide. This should have been provided for you. If you do not have a new version of the document, contact Capella’s support team: support@capellasystems.net
- Cambria Stream nodes may change. This means that the ip addresses, names, etc may also change. This is more likely the case when running the non-normal upgrade steps. In the case that the Cambria Stream nodes do change, you will need to manually re-configure your incoming streams to point to the new Cambria Stream nodes after the upgrade.
- Cambria Stream Manager WebUI and Cambria Stream Manager REST API urls may also change during the installation process. This is more likely to be the case if not running the normal upgrade process
- Upgrading is not currently seamless. Programs will need to be taken down during the upgrade process
- In the case that argo-rollouts does not work on upgrading the Cambria Stream environment, the Cambria Stream application will need to be uninstalled and then re-installed with the new information. In this case, the database will be wiped and all programs will be deleted. This is why it is important to save all programs, configuration files, keys, etc.
To save all programs from the Cambria Stream WebUI:
- Select all of the programs in the Programs list
- Click on the Export Program button. This should prompt you to download the set of programs to a .lpef file
Note: in certain cases (Eg. small number of nodes), the argo-rollouts tool becomes stuck trying to upgrade the Cambria Stream worker nodes / argo-rollouts does not properly upgrade to the new pods. In this case, skip to section 8.2. Option 2: Upgrade via Cambria Stream Reinstall.
8.1. Option 1: Normal Upgrade via Argo-Rollouts
This upgrade method is best for when changing version numbers, secrets such as the license key, WebUI users, etc, and Cambria Stream | Stream Manager specific settings such as max number of pods, replicas, etc.
Known Issues
- cambriaStreamManagerAPIToken cannot currently be updated via this method
- pgClusterPassword cannot currently be updated via this method
In the kubernetes directory, download the argo-rollouts dashboard executable from the following location (Download the one for your OS):
https://github.com/argoproj/argo-rollouts/releases/tag/v1.7.1
Rename the file to kubectl-argo-rollouts.exe if on Windows or kubectl-argo-rollouts on Linux / MacOS.
If on Linux / MacOS, do the following:
- Move the file to /usr/local/bin in order for it to work (Eg. sudo mv ./kubectl-argo-rollouts /usr/local/bin/kubectl-argo-rollouts).
- Make the file executable:
sudo chmod +x /usr/local/bin/kubectl-argo-rollouts
Follow section 3.4. Creating and Editing Helm Configuration File to download and edit your new capellaStreamConfig.yaml file.
Make sure there are enough nodes in your Kubernetes environment for pods to get attached to.
For number of managerReplicas, there should be an equal amount of nodes running (Ex. managerReplicas = 3; There should be 3 nodes with the managerInstanceType running). For number of maxWorkerInstances, there should be an equal amount of nodes running (Ex. maxWorkerInstances = 2; There should be 2 nodes with the workerInstanceType running)
Run the following command to perform the update / upgrade (Note: for this case, the postgres database should be preserved)
helm upgrade capella-stream capella-stream.tgz --values capellaStreamConfig.yaml
Run this command in order to activate the argo-rollouts dashboard
kubectl argo rollouts dashboard
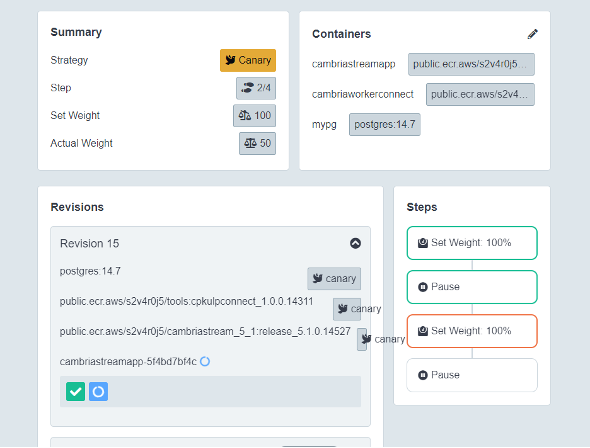
In a web browser, go to the address http://localhost:3100/rollouts. You should see a dashboard similar to the following:
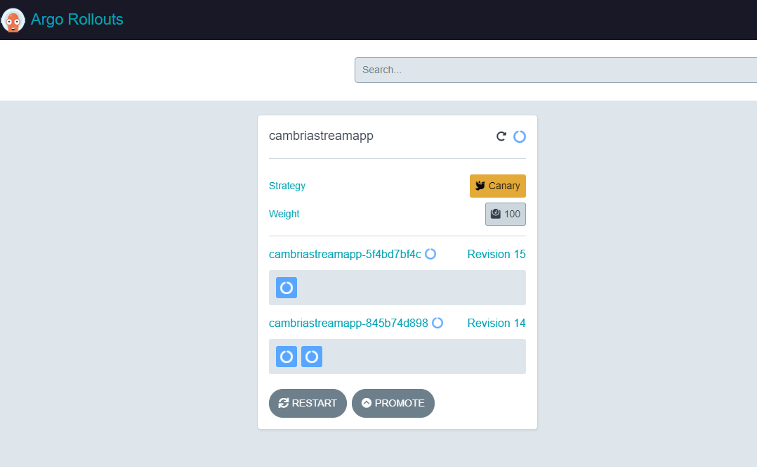
Make sure that the window says cambriastreamapp. If it does not, you will need to change the namespace. You can change this by going to the dropdown on the top right corner of this page and choosing the capella-worker namespace.
Click on the button next to Weight (the gray button). At this point, argo-rollouts is running step one of the four steps. When step one is done, you should see something similar to the following:
Note: if it seems like it is taking a while for the UI to move on to the next step, click on the Promote button to get to the next step.
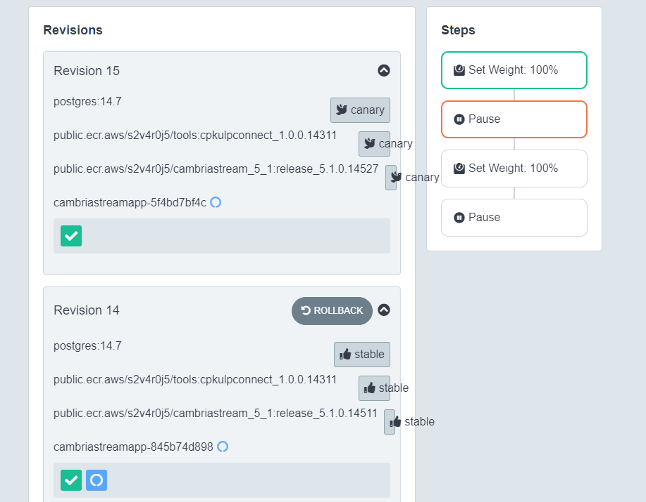
If the first set of nodes were upgraded correctly, verify that the upgraded node(s) are working properly. Once done, click the Promote button to move on to step 3 which will upgrade the next set of nodes.
If the second set of nodes were upgraded correctly, verify that the upgraded node(s) are working properly. Once done, click the Promote All button to finish upgrading the rest of the Cambria Stream nodes.
Back in your terminal window, use CTRL/CMD + C to exit the argo-rollouts tool. Run the following commands to upgrade the Cambria Stream Manager pods:
kubectl rollout restart deployment cambriastreammanagerapp -n default
kubectl rollout restart deployment cambriastreammanagerwebui -n default
Wait a few minutes for the kubernetes pods to install properly.
8.2. Option 2: Upgrade via Cambria Stream Reinstallation
For any upgrade cases for the Cambria Stream environment, this is the most reliable option. This upgrade option basically uninstalls all of the Cambria Stream components and then reinstall with the new Helm chart and values (.yaml) file. As a result, this will delete the database and delete all of your programs in the Cambria Stream UI.
- Save all of your Cambria Stream programs and any configuration files, keys (Eg. DRM keys, AWS keys, etc)
- Follow section 3.4. Creating and Editing Helm Configuration File to download and edit your new capellaStreamConfig.yaml file.
- In a command line / terminal window in your local server, run the following command:
helm uninstall capella-stream --wait
- Deploy the Helm configuration file with the following command.
helm upgrade --install capella-stream capella-stream.tgz --values capellaStreamConfig.yaml --wait
8.3. Upgrade Verification
Perform the following checks to make sure your Cambria Stream Manager and Cambria Stream are running with the correct version and are ready to use:
1. Follow section 4.0. Verify Cambria Stream Manager / Stream Installation to make sure the expected components are installed correctly, pods are in a Running state, and that you can access the WebUI.
2. In a command-line / terminal window, get the Cambria Stream REST API url:
kubectl get service/cambriastreamservice -o=jsonpath='{.status.loadBalancer.ingress[0].hostname}'
The command will give you the IP address / hostname. The full REST API url will look something like this:
https://<hostname>:8758/CambriaLM/v1
3. Check the Cambria Stream Manager version. In a command-line / terminal window, run the following command (replace <hostname> with your Cambria Stream Manager node’s hostname):
curl -k https://<hostname>:8758/CambriaLM/v1/SystemInfo
You can also check this in a web browser by putting in the url bar:
https://<hostname>:8758/CambriaLM/v1/SystemInfo
Check that the version matches the Cambria Stream Manager version that you are expecting (Eg. 5.3.0.18678).
If it does not, double check your Helm values file to make sure the correct version is configured and follow the upgrade steps again.
4. In the Cambria Stream Manager WebUI, check the Machines tab and make sure any Cambria Stream nodes have been added automatically. It may take more than five minutes for new Cambria Stream nodes to show up in the Machines tab.
If the Cambria Stream nodes that you are expecting are not showing up in the Machines tab, try to add them manually by doing the following:
- Get the IP address of the Cambria Stream pod (Eg. cambriastreamapp-xxxxx):
kubectl get pod/<CambriaStreamPodName> -n capella-worker -o=jsonpath={.status.podIP}
If no IP address shows up, this means the Cambria Stream pod is not connected to a node. Make sure you use Cambria Stream pods that are connected to a Kubernetes node.
- In the Cambria Stream Manager WebUI in the Machines tab, click on the Add button and put the pod IP. This should add a new machine with the pod’s IP address. It may take a few minutes for the machine to go to a Standby / Online state. If, after a few minutes, the machine is not in a Standby / Online state, this means Cambria Stream is not running on the pod. Retry the upgrade steps again.
5. If during the upgrade process there are programs missing from the UI or all of the programs are gone, you can re-import the saved programs by doing the following:
- In the Cambria Stream Manager WebUI, click on the Import Program button. This will trigger the upload file explorer window where you can select the .lpef program file(s) with the programs before the upgrade
6. You will need to setup your incoming streams to the new Cambria Stream node IP addresses. Follow the steps in Section 5. Running Live Encoding Programs
9. Quick Reference: Installation, Testing, and Teardown
9.1. Installation (Deploy from Windows to Akamai Kubernetes)
Create your Kubernetes directory (Eg.%USERPROFILE%\kubernetes\Akamai).
In the Akamai Dashboard, create a new Kubernetes Cluster on Akamai Cloud with at least 1 node for Cambria Stream Manager and at least 1 node for Cambria Stream. Download the config file for the Kubernetes Cluster into the Kubernetes Directory.
Start a new command line / terminal window in the Kubernetes Directory. Download / Install Kubernetes tools into the kubernetes directory (extract the helm.exe file from the zip archive):
curl -LO https://dl.k8s.io/release/v1.31.0/bin/windows/amd64/kubectl.exe
curl -LO https://get.helm.sh/helm-v3.15.1-windows-amd64.zip
Configure kubectl:
set KUBECONFIG=<path-to-your-kubeconfig-file>.yaml
Install Prerequisites as needed:
kubectl apply -f https://raw.githubusercontent.com/cloudnative-pg/cloudnative-pg/release-1.20/releases/cnpg-1.20.1.yaml
kubectl create namespace argo-rollouts
kubectl apply -n argo-rollouts -f https://github.com/argoproj/argo-rollouts/releases/download/v1.5.1/install.yaml
kubectl create namespace argo-events
kubectl apply -f https://raw.githubusercontent.com/argoproj/argo-events/stable/manifests/install.yaml
kubectl apply -f https://github.com/cert-manager/cert-manager/releases/download/v1.12.0/cert-manager.yaml
kubectl apply -f https://raw.githubusercontent.com/kubernetes/ingress-nginx/controller-v1.8.1/deploy/static/provider/cloud/deploy.yaml
If using GPU instances, run these commands to install NVIDIA driver and toolkit:
helm repo add nvidia https://helm.ngc.nvidia.com/nvidia
helm repo update
helm install nvidia-operator nvidia/gpu-operator --namespace gpu-operator --create-namespace
Wait at least 5 minutes for prerequisites to fully install. Meanwhile, create Helm value configuration yaml file and edit the file based on your environment
Option 1: (Default) Regular Cambria Stream Application
curl -Lo capella-stream.tgz "https://www.dropbox.com/scl/fi/x2vyn3yt39avh65pqh699/capella-stream-0.4.11.tgz?rlkey=8lx2sm2fnqx91xibc7hnj3h7z"
Option 2: Cambria Stream Application with Auto Ad Break (OCR) Feature
curl -Lo capella-stream.tgz "https://www.dropbox.com/scl/fi/nyx66r07ilfcjbmy045a6/capella-stream-0.4.11-ocr.tgz?rlkey=4nz8paifjodia1v7zxydiss2q"
Must run after choosing one of the above options
helm show values capella-stream.tgz > capellaStreamConfig.yaml
Deploy the Cambria Stream | Stream Manager:
helm upgrade --install capella-stream capella-stream.tgz --values capellaStreamConfig.yaml
9.2. Installation (Deploy from Linux to Akamai Kubernetes)
Create your kubernetes directory (Eg. $HOME/kubernetes/Akamai) and start the terminal in the kubernetes directory. Set the kubernetes directory to have read/write access:
mkdir -p $HOME/kubernetes/Akamai
chmod -R 700 $HOME/kubernetes/Akamai
In the Akamai Dashboard, create a new Kubernetes Cluster on Akamai Cloud with at least 1 node for Cambria Stream Manager and at least 1 node for Cambria Stream. Download the config file for the Kubernetes Cluster into the Kubernetes Directory.
Start a new command line / terminal window in the Kubernetes Directory. Download / Install Kubernetes tools into the Kubernetes Directory (extract the helm.exe file from the zip archive):
curl -LO https://dl.k8s.io/release/v1.31.0/bin/linux/amd64/kubectl
sudo install -o root -g root -m 0755 kubectl /usr/local/bin/kubectl
rm ./kubectl
curl -fsSL -o get_helm.sh https://raw.githubusercontent.com/helm/helm/main/scripts/get-helm-3
chmod 700 get_helm.sh
./get_helm.sh
rm ./get_helm.sh
Configure kubectl, create Helm value configuration yaml file and edit the file based on your environment:
export KUBECONFIG=<path-to-your-kubeconfig-file>.yaml
Install Prerequisites as needed:
kubectl apply -f https://raw.githubusercontent.com/cloudnative-pg/cloudnative-pg/release-1.20/releases/cnpg-1.20.1.yaml
kubectl create namespace argo-rollouts
kubectl apply -n argo-rollouts -f https://github.com/argoproj/argo-rollouts/releases/download/v1.5.1/install.yaml
kubectl create namespace argo-events
kubectl apply -f https://raw.githubusercontent.com/argoproj/argo-events/stable/manifests/install.yaml
kubectl apply -f https://github.com/cert-manager/cert-manager/releases/download/v1.12.0/cert-manager.yaml
kubectl apply -f https://raw.githubusercontent.com/kubernetes/ingress-nginx/controller-v1.8.1/deploy/static/provider/cloud/deploy.yaml
If using GPU instances, run these commands to install NVIDIA driver and toolkit:
helm repo add nvidia https://helm.ngc.nvidia.com/nvidia
helm repo update
helm install nvidia-operator nvidia/gpu-operator --namespace gpu-operator --create-namespace
Wait at least 5 minutes for prerequisites to fully install before moving on to the next step. Meanwhile, create Helm value configuration yaml file and edit the file based on your environment.
Option 1: (Default) Regular Cambria Stream Application
curl -Lo capella-stream.tgz "https://www.dropbox.com/scl/fi/x2vyn3yt39avh65pqh699/capella-stream-0.4.11.tgz?rlkey=8lx2sm2fnqx91xibc7hnj3h7z"
Option 2: Cambria Stream Application with Auto Ad Break (OCR) Feature
curl -Lo capella-stream.tgz "https://www.dropbox.com/scl/fi/nyx66r07ilfcjbmy045a6/capella-stream-0.4.11-ocr.tgz?rlkey=4nz8paifjodia1v7zxydiss2q"
Must run after choosing one of the above options
helm show values capella-stream.tgz > capellaStreamConfig.yaml
Deploy Cambria Stream | Stream Manager:
helm upgrade --install capella-stream capella-stream.tgz --values capellaStreamConfig.yaml
9.3. Installation (Deploy from MacOS to Akamai Kubernetes)
Create your Kubernetes Directory (Eg. $HOME/kubernetes/Akamai) and start the terminal in the kubernetes directory. Set the kubernetes directory to have read/write access:
mkdir -p $HOME/kubernetes/Akamai
chmod -R 700 $HOME/kubernetes/Akamai
In the Akamai Dashboard, create a new Kubernetes Cluster on Akamai Cloud with at least 1 node for Cambria Stream Manager and at least 1 node for Cambria Stream. Download the config file for the Kubernetes Cluster into the Kubernetes Directory.
Start a new command line / terminal window in the Kubernetes Directory. Download / Install Kubernetes tools into the kubernetes directory (extract the helm.exe file from the zip archive):
brew install kubectl
brew install helm
Configure kubectl, create Helm value configuration yaml file and edit the file based on your environment:
export KUBECONFIG=<path-to-your-kubeconfig-file>.yaml
Install Prerequisites as needed:
kubectl apply -f https://raw.githubusercontent.com/cloudnative-pg/cloudnative-pg/release-1.20/releases/cnpg-1.20.1.yaml
kubectl create namespace argo-rollouts
kubectl apply -n argo-rollouts -f https://github.com/argoproj/argo-rollouts/releases/download/v1.5.1/install.yaml
kubectl create namespace argo-events
kubectl apply -f https://raw.githubusercontent.com/argoproj/argo-events/stable/manifests/install.yaml
kubectl apply -f https://github.com/cert-manager/cert-manager/releases/download/v1.12.0/cert-manager.yaml
kubectl apply -f https://raw.githubusercontent.com/kubernetes/ingress-nginx/controller-v1.8.1/deploy/static/provider/cloud/deploy.yaml
If using GPU instances, run these commands to install NVIDIA driver and toolkit:
helm repo add nvidia https://helm.ngc.nvidia.com/nvidia
helm repo update
helm install nvidia-operator nvidia/gpu-operator --namespace gpu-operator --create-namespace
Wait at least 5 minutes for prerequisites to fully install before moving on to the next step. Meanwhile, create Helm value configuration yaml file and edit the file based on your environment.
Option 1: (Default) Regular Cambria Stream Application
curl -Lo capella-stream.tgz "https://www.dropbox.com/scl/fi/x2vyn3yt39avh65pqh699/capella-stream-0.4.11.tgz?rlkey=8lx2sm2fnqx91xibc7hnj3h7z"
Option 2: Cambria Stream Application with Auto Ad Break (OCR) Feature
curl -Lo capella-stream.tgz "https://www.dropbox.com/scl/fi/nyx66r07ilfcjbmy045a6/capella-stream-0.4.11-ocr.tgz?rlkey=4nz8paifjodia1v7zxydiss2q"
Must run after choosing one of the above options
helm show values capella-stream.tgz > capellaStreamConfig.yaml
Deploy Cambria Stream | Stream Manager:
helm upgrade --install capella-stream capella-stream.tgz --values capellaStreamConfig.yaml
9.4. Testing
If using stream routing, see Section 5.1.2.3. Option 1: Use Streaming Router
Get the external IP address of the Cambria Stream Manager service and log in to the Web UI. Create a new Cambria Stream program. See section 5.2. Using / Testing Cambria Stream for details.
Start streaming the program. Get the ip address of the node that the program is streaming on:
Replace <pod-name> with your pod name
kubectl get pod/<pod-name> -n capella-worker -o=jsonpath={.spec.nodeName}
Replace <node-name> with the result from the above command
kubectl get node/<node-name> -n capella-worker -o=jsonpath={.status.addresses[1].address}
Setup your sender stream with the IP address of the node + the port number(s) for the source streams. If using the RtpSender tool to send an incoming stream, see Section 5.1.2.3. Option 3: Using RtpSender.out Tool.
9.5. Upgrades and Teardown
9.5.1. Cambria Stream | Stream Manager and/or the Kubernetes Cluster Upgrades
Edit the capellaStreamConfig.yaml file and then run the following commands (See Section 8. Updating / Upgrading Kubernetes Cluster for more details and warnings):
helm upgrade capella-stream capella-stream.tgz --values capellaStreamConfig.yaml
kubectl argo rollouts dashboard
In a web browser, go to http://localhost:3100/rollouts. Go through each of the Weight steps to upgrade.
Restart Cambria Stream Manager deployments:
kubectl rollout restart deployment cambriastreammanagerapp -n default
kubectl rollout restart deployment cambriastreammanagerwebui -n default
9.5.2. Cambria Stream | Stream Manager Uninstall
If you want to to uninstall Cambria Stream Manager and Cambria Stream, run the following command:
helm uninstall capella-stream --wait
9.5.3. Kubernetes Cluster Teardown
To teardown the entire Kubernetes Cluster, do the following:
- In the Akamai Cloud Home page, click on the Kubernetes section and delete the Cluster
- In the NodeBalancers section, delete the node balancer that was created by the Kubernetes Cluster
- In the Volumes section, delete the volumes that were created by the Kubernetes Cluster
10. Quick Reference: Helpful Commands/Info for After Installation
This section provides helpful commands and other information that may be useful after the installation process such as how to get the WebUI address, what ports are available to use for incoming sources, etc.
Akamai Kubernetes Kubeconfig File [ For use with kubectl and Akamai Kubernetes Dashboard ]
- Log in to the Akamai Cloud dashboard and go to Clusters. Select your cluster from the list and click on the configuration file towards the top of the page.
Akamai Kubernetes Dashboard
- Log in to the Akamai Cloud dashboard and go to your Kubernetes Cluster. Click on the Kubernetes Dashboard link.
- Use the Akamai Kubernetes Cluster Configuration File to log in to the dashboard
Cambria Stream Manager WebUI (via kubectl)
- Run this command to get the webui address:
kubectl get service/cambriastreammanagerwebuiservice -n default -o=jsonpath="{'https://'}{.status.loadBalancer.ingress[0].hostname}{':8171'}"
- To log in to the WebUI, the credentials are located in the Helm values .yaml file that you configure (See section 3.4. Creating and Editing Helm Configuration File)
Cambria Stream Manager WebUI (via Kubernetes Dashboard)
-
In the Akamai Kubernetes Dashboard for your cluster, go to Services and look for the cambriastreammanagerwebuiservice service. Copy the IP address of one of the External Endpoints
-
The WebUI address should be https://[ EXTERNAL IP ]:8171. To log in to the WebUI, the credentials are located in the Helm values .yaml file that you configure (See section 3.4. Creating and Editing Helm Configuration File)
Cambria Stream Manager REST API (via kubectl)
- Run the following command to get the base REST API Web Address:
kubectl get service/cambriastreamservice -n default -o=jsonpath="{'https://'}{.status.loadBalancer.ingress[0].hostname}{':8758'}"
The REST API url should look similar to this:
https://45-79-231-137.ip.linodeusercontent.com:8758/CambriaLM/v1/Events?usertoken=12345678-1234-43f8-b4fc-53afd3893d5f
Cambria Stream Manager REST API (via Kubernetes Dashboard)
- In the Akamai Kubernetes Dashboard for your cluster, go to Services and look for the cambriastreamservice service. Copy the IP address of one of the External Endpoints
The REST API should look similar to this:
https://45-79-231-137.ip.linodeusercontent.com:8758/CambriaLM/v1/Events?usertoken=12345678-1234-43f8-b4fc-53afd3893d5f
Leader Cambria Stream Manager Pod
- Run the following command to get the name of the Cambria Stream Manager leader pod:
kubectl get lease -o=jsonpath="{.items[0].spec.holderIdentity}"
Cambria Stream Instance External IP
-
In the Cambria Stream Manager WebUI, go to the Machines tab and copy the name of the machine (pod)
-
Run the following commands with the name of the machine (aka.
<pod-name>): -
Replace
<pod-name>with your pod name
kubectl get pod/<pod-name> -n capella-worker -o=jsonpath={.spec.nodeName}
- Replace
<node-name>with the result from the above command
kubectl get node/<node-name> -n capella-worker -o=jsonpath={.status.addresses[1].address}
Remote Access to Kubernetes Pod
- The general command for remote accessing a pod is:
kubectl exec -it <pod name> -n <namespace> -- /bin/bash
- Example with Cambria Stream:
kubectl exec -it cambriastreamapp-5c79586784-wbfvf -n capella-worker -- /bin/bash
Extracting Cambria Stream Manager | Cambria Stream | Cambria License Logs
In a machine that has kubectl and the kubeconfig file for your Kubernetes cluster, open a terminal window and make sure to set the KUBECONFIG environment variable to the path of your kubeconfig file. Then run one or more of the following commands depending on what types of logs you need (or that Capella needs). You will get a folder full of logs. Compress these logs into one zip file and send it to Capella:
<pod-name>: the name of the pod to grab logs from (Eg. cambriastreamapp-5c79586784-wbfvf)
Cambria Stream
kubectl cp <pod name>:/opt/capella/CambriaStream/Logs ./CambriaStrmLogs -n capella-worker
Cambria Stream Manager
kubectl cp <pod-name>:/opt/capella/CambriaStreamManager/Logs ./CambriaStrmManLogs -n default
Cambria License Manager (Cambria Stream)
kubectl cp <pod-name>:/opt/capella/CambriaLicenseManager/Logs ./CambriaStrLicLogs -n capella-worker
Cambria License Manager (Cambria Stream Manager)
kubectl cp <pod-name>:/opt/capella/CambriaLicenseManager/Logs ./CambriaStrmManLicLogs -n default
Copy File(s) to Cambria Stream Pod
In some cases, you might need to copy files to a Cambria Stream pod. For example, you have an MP4 file you want to use as a failover source for your stream. In this case, to copy the file over to the Cambria Stream pod, do the following:
kubectl cp <host-file-path> [ Pod name ]:[ Path Inside Pod to Copy File ] -n capella-worker
Example:
- Copy file to Cambria Stream pod
kubectl cp /mnt/n/MyFailoverSource.mp4 cambriastreamapp-7c55887db9-t42v7:/var/media/MyFailoverSource.mp4 -n capella-worker
- Copy file to Cambria Stream Manager pod
kubectl cp C:\MyKeys\MyKeyFile.key cambriastreammanagerapp-695dcc848f-vjpc7:/var/keys/MyKeyFile.key -n default
- Copy directory to Cambria Stream container
kubectl cp /mnt/n/MyMediaFiles cambriastreamapp-7c55887db9-t42v7:/var/temp/mediafiles -n capella-worker
Restarting / Re-creating Pods
Kubectl does not currently have a way to restart pods. Instead, a pod will need to be “restarted” by deleting the pod which causes a new pod to be created / existing pod to take over the containers.
kubectl delete pod <pod-name> -n <namespace>
Example:
- Delete Cambria Stream Container
kubectl delete pod cambriastreamapp-7c55887db9-t42v7 -n capella-worker
- Delete Cambria Stream Manager Container
kubectl delete pod cambriastreammanagerapp-695dcc848f-vjpc7 -n default
11. Glossary
This glossary provides a brief definition / description of some of the more common terms found in this guide.
11.1. Kubernetes
For Kubernetes terms, please refer to the Kubernetes Glossary: https://kubernetes.io/docs/reference/glossary/?fundamental=true
11.2. Third-Party Tools
Argo: the Argo third-party system is a collection of tools for orchestrating parallel jobs in a Kubernetes environment.
Argo-Rollouts: an Argo tool used for upgrading containers in a Kubernetes Cluster in a rollout fashion (Eg. upgrade 50% of the containers first, then 80% of the containers, then 100% of the containers).
Argo-Events: an Argo tool that triggers specific Kubernetes functions based on events from other dependencies such as webhook, s3, etc.
Cert-Manager: the cert-manager addon automates the process of retrieving and managing TLS certificates. These certificates are periodically renewed to keep the certificates up to date and valid. Helm: the Helm third-party tool is used for deploying / managing (install, update, delete) deployments for Kubernetes Cluster applications.
Ingress-Nginx: the ingress-nginx addon is an ingress server using Nginx as a reverse proxy and load balancer. In this case, ingress-nginx is used for applying domain name use to the Kubernetes services (REST API, WebUI, etc).
11.3. Capella Applications
cambrialeaderelector: this container is used for Cambria Stream Manager replication in that it decides which of the Cambria Stream Manager instances is the primary instance. This container exists in all cambriastreammanagerapp-xyz pods.
cambriastreamapp: the Cambria Stream application container. This container exists in all cambriastreamapp-xyz pods.
cambriastreammanagerapp: the Cambria Stream Manager application container. This container exists in all cambriastreammanagerapp-xyz pods.
pgcluster-capella: this type of pod holds the PostgreSQL database that Cambria Stream Manager uses / interacts with.
cambriaworkerconnect: this container is used for automatically connecting Cambria Stream instances to Cambria Stream Manager. This container exists in all cambriastreamapp-xyz pods.
For any questions or technical support, contact Capella Systems at: